There’s something truly special about a piece of homemade jerky. It’s not just a snack; it’s a taste of adventure, a burst of flavor, and a testament to delicious preservation. If you’ve ever dreamt of crafting your own savory strips, packed with flavor and free from questionable additives, then a Food Dehydrator For Jerky is about to become your new best friend. Forget store-bought options; with the right tools and a little know-how, you’ll be making batches of mouth-watering jerky that’ll make you the envy of every snack enthusiast.
What is a Food Dehydrator and Why It’s Your Jerky MVP
At its core, a food dehydrator is a clever kitchen appliance designed to gently remove moisture from food. Think of it as a controlled, warm breeze that dries out your ingredients without actually cooking them, leaving you with concentrated flavors and a much longer shelf life. For jerky, this process is absolutely paramount.
Why is a food dehydrator for jerky so indispensable? It’s all about precision and consistency. Unlike an oven, which can dry unevenly and sometimes “cook” the meat, a dehydrator provides a stable, low-temperature environment with continuous airflow. This ensures every strip of meat dries uniformly, reaching that ideal chewy-yet-firm texture. This consistent drying isn’t just about taste; it’s crucial for food safety, preventing spoilage by reducing the water activity where bacteria thrive. Plus, it locks in all those fantastic marinades and seasonings, delivering a flavor punch in every bite. It’s also surprisingly energy-efficient, making it a more economical choice for regular jerky production compared to running a conventional oven for hours.
Choosing Your Jerky Champion: Types of Food Dehydrators
Stepping into the world of food dehydrators, you’ll primarily encounter two main types: those with horizontal airflow and those with vertical airflow. Understanding the difference is key to picking the best food dehydrator for jerky.
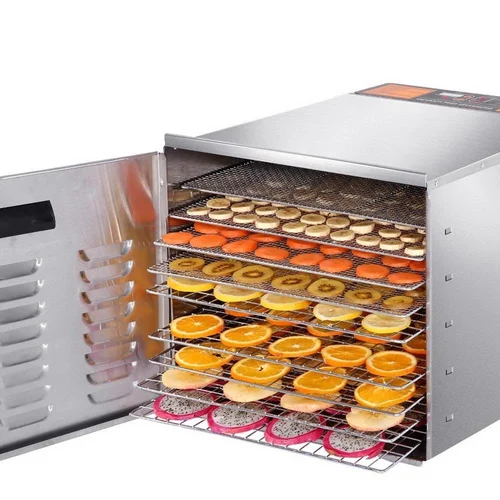
Horizontal airflow dehydrators, often rectangular or square, feature a fan mounted at the back. This design pushes warm air across the trays, from back to front, ensuring remarkably even drying. This is generally considered the gold standard for jerky because it prevents flavors from mixing (a huge plus if you’re drying different marinades simultaneously) and ensures every piece dries at the same rate, regardless of its position on the tray. Many serious jerky makers, like our expert “Chef Julian Thorne,” recommend these models. “For true jerky perfection,” Chef Thorne advises, “a rear-mounted fan in your food dehydrator ensures consistent drying across all your meat strips, eliminating hot spots and sticky situations.”
Vertical airflow dehydrators, typically round and stackable, have their fan and heating element either at the top or bottom. Air circulates vertically through the trays. These are often more compact and budget-friendly, making them a great entry point. However, you might need to rotate the trays periodically to achieve the most even drying, as pieces closer to the fan might dry faster.
When selecting a food dehydrator for jerky, keep these features in mind:
- Adjustable Thermostat: Essential for hitting the critical 160-165°F (71-74°C) for food safety.
- Sufficient Wattage: Higher wattage generally means more efficient and faster drying.
- Capacity: How many trays and how much drying space do you need? Large batches of jerky require ample room.
- Tray Material: Stainless steel trays are durable, easy to clean, and don’t retain odors, a big bonus for meat.
- Digital Timer and Auto Shut-off: These features let you “set it and forget it,” preventing over-drying.
- Ease of Cleaning: Removable, dishwasher-safe trays are a lifesaver after a big jerky session.
Mastering the Art: Basic Usage of Your Food Dehydrator for Jerky
Making jerky at home with a dehydrator is a straightforward process, but a few crucial steps will elevate your results from good to legendary.
Preparation is Key
- Choosing the Right Meat: Lean cuts are your best friends here. Fat doesn’t dehydrate well and can cause your jerky to spoil prematurely. Opt for lean beef cuts like top round, bottom round, eye of round, or flank steak. For poultry, choose lean breast meat.
- Slicing Perfection: Thin, even slices are critical for consistent drying. Aim for about 1/8 to 1/4 inch thick. For easier slicing, partially freeze your meat for 1-2 hours; it makes the meat firmer and simpler to cut uniformly. Slice against the grain for a more tender chew, or with the grain for a chewier, more traditional jerky texture.
- The Marinade Magic: This is where the flavor truly comes alive! Combine your chosen marinade ingredients (soy sauce, Worcestershire, liquid smoke, garlic powder, onion powder, paprika, brown sugar, black pepper, cayenne pepper, etc.) in a non-reactive container or a large zip-top bag. Add your sliced meat, ensuring every piece is thoroughly coated. Marinate in the refrigerator for at least 6 hours, but ideally 12-24 hours, for maximum flavor penetration. “The longer you let those flavors mingle,” explains Chef Thorne, “the deeper and more satisfying your jerky will be. Don’t rush this step!”
Loading and Drying
- Arrange with Care: After marinating, remove the meat from the fridge. Pat the slices dry with paper towels to remove any excess marinade; this speeds up the drying process and prevents steaming. Arrange the meat strips on your dehydrator trays in a single layer, ensuring they don’t touch or overlap. Ample space between pieces allows for optimal airflow.
- Set Your Temperature: This is crucial for food safety. Set your food dehydrator for jerky to 160-165°F (71-74°C). The USDA recommends that meat reach an internal temperature of 160°F to be safe. Many dehydrators can maintain this, but if yours doesn’t reach 160°F, you can finish the jerky in a preheated oven at 275°F (135°C) for 10 minutes after dehydrating to ensure it hits the safe internal temperature.
- The Waiting Game: Drying time can vary based on meat thickness, dehydrator model, and humidity, but it typically ranges from 3-6 hours. Start checking your jerky around the 3-4 hour mark and then every 30-60 minutes thereafter.
Doneness Test
How do you know when your jerky is perfectly done? Take a piece, let it cool for a few minutes, then bend it. Properly dried jerky should bend and crack, but not break completely in half. You might see white fibers in the meat when bent, indicating it’s dry. If it’s still pliable and soft, it needs more time. If it snaps like a cracker, it’s over-dried (but still edible!).
Beyond Beef: Delicious Jerky Recipes and Ideas
While beef jerky is the classic, your food dehydrator for jerky opens up a world of possibilities!
- Classic Beef Jerky: A simple marinade often includes soy sauce, Worcestershire sauce, black pepper, garlic powder, onion powder, and a touch of brown sugar for sweetness.
- Spicy Sriracha Jerky: Add a generous dash of sriracha to your marinade for a fiery kick.
- Teriyaki Turkey Jerky: Substitute beef with thinly sliced turkey breast and use a teriyaki-based marinade for a lighter, savory-sweet snack.
- Venison Jerky: For hunters, a dehydrator is perfect for preserving venison. Marinades with juniper berries, rosemary, and black pepper complement game meats beautifully.
- Chicken Jerky: While less common, lean chicken breast can also be dehydrated. Ensure it’s sliced very thin and reaches the proper internal temperature for safety.
Experiment with different spices, herbs, and sauces. The dehydrator is your canvas for culinary creativity!
Pro Tips and Tricks for Dehydrating Jerky Like a Pro
Want to take your jerky game to the next level? Here are some insider secrets:
- Pat Dry, Always: Even after marinating, patting your meat slices thoroughly dry with paper towels is a simple step that significantly reduces drying time and improves texture.
- Rotate for Evenness: Especially with vertical airflow models, rotating your trays (moving bottom to top, top to bottom) every hour or two can help ensure all pieces dry at a consistent rate.
- Blot Away Fat: Occasionally, small fat droplets might appear on the surface of your jerky during drying. Gently blot these off with a clean paper towel to prevent rancidity and ensure optimal texture.
- Consider Curing Salts: For an extra layer of food safety and a longer shelf life, some jerky makers opt to include curing salt (like Prague Powder #1) or celery juice powder in their marinades. This is particularly important for ground meat jerky.
- Don’t Overcrowd: It’s tempting to fill every inch of your dehydrator, but giving each piece room to breathe is crucial for proper airflow and efficient drying.
- Test Throughout: Don’t wait until the very end to check for doneness. Start testing pieces a few hours in, removing those that are ready and allowing others more time.
Storing Your Dehydrated Masterpiece
Once your jerky is perfectly dried and cooled completely, proper storage is essential to maintain its quality and extend its shelf life. Store your homemade jerky in airtight containers, such as zip-top bags (with as much air removed as possible) or vacuum-sealed bags. Keep it in a cool, dry place away from direct sunlight. When stored correctly, homemade jerky can last for several weeks at room temperature, and even longer in the refrigerator or freezer.
Nutritional Value of Homemade Jerky
One of the great advantages of making jerky at home with a food dehydrator for jerky is knowing exactly what goes into it. Homemade jerky is typically a fantastic source of lean protein, making it an excellent, satisfying snack for athletes, hikers, or anyone looking for a healthy alternative to processed options. You control the sodium, sugar, and preservatives, allowing you to create a snack tailored to your dietary needs. It’s a clean fuel that keeps you going!
Dehydrators vs. Other Preservation Methods for Jerky
While you can technically make jerky using other methods, a food dehydrator offers distinct advantages:
- Oven: An oven can work in a pinch, but it’s often less precise with temperature control, leading to unevenly dried or “cooked” jerky. It’s also far less energy-efficient for the long drying times required.
- Smoker: Smokers infuse amazing flavor, but their primary function isn’t dehydration. They often don’t reach the consistent, low temperatures needed for pure dehydration, and drying can be less uniform. Many jerky enthusiasts use a smoker first for flavor, then finish in a dehydrator.
- Air Drying: This traditional method is highly dependent on climate and can be risky due to uncontrolled temperatures, humidity, and exposure to contaminants. It’s generally not recommended for home use due to food safety concerns.
A food dehydrator provides the optimal balance of control, safety, and efficiency for producing high-quality jerky every time.
Frequently Asked Questions About Food Dehydrators for Jerky
What is the best temperature for making jerky in a dehydrator?
For food safety, it’s best to set your food dehydrator for jerky to 160-165°F (71-74°C) to ensure the meat reaches an internal temperature of 160°F, killing any potential bacteria.
How long does it take to make jerky in a food dehydrator?
Drying times vary, but typically, beef jerky takes anywhere from 3 to 6 hours in a food dehydrator. Factors like meat thickness, ambient humidity, and your dehydrator’s wattage can influence this.
What kind of meat is best for jerky?
Lean cuts of beef such as top round, bottom round, eye of round, and flank steak are ideal for jerky. Avoid fatty cuts, as fat can spoil quickly and shorten your jerky’s shelf life.
Can I use a food dehydrator for other things besides jerky?
Absolutely! A food dehydrator is a versatile appliance perfect for drying fruits, vegetables, herbs, fruit leathers, and even pet treats. It’s a great investment for preserving a variety of foods.
How do I know when my jerky is done?
To test for doneness, let a piece of jerky cool, then bend it. It should be firm, pliable, and crack slightly without breaking in half. If it’s too soft, it needs more time; if it snaps, it’s over-dried.
Your Jerky Journey Starts Now!
There’s immense satisfaction in pulling a batch of perfectly dried, richly flavored jerky from your food dehydrator for jerky. It’s a journey from raw ingredients to a portable, protein-packed snack that’s as delicious as it is rewarding. With the insights and tips shared here, you’re well-equipped to dive into the world of homemade jerky. So, grab your lean cuts, mix up your favorite marinade, and let your food dehydrator work its magic. Get ready to enjoy the incredible taste and convenience of jerky made right in your own kitchen!